
New
Creative idea
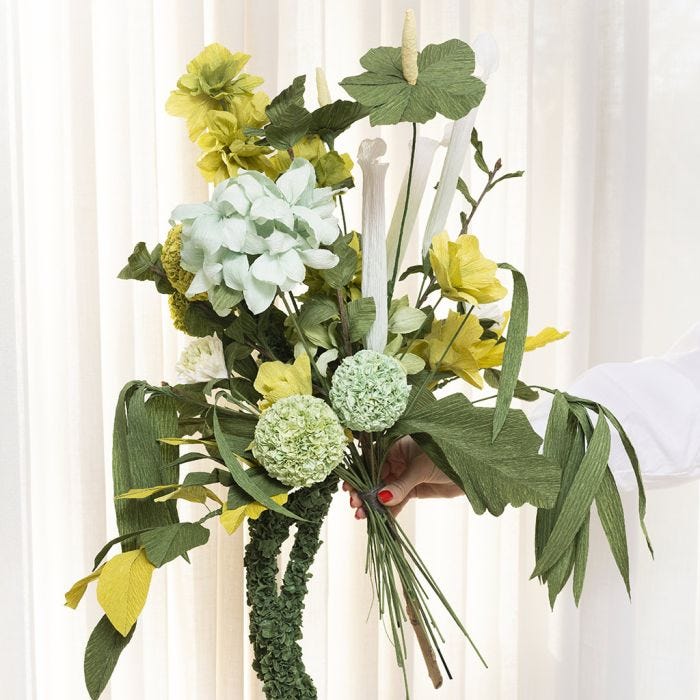
Crepe paper bouquet for a large vase
#v17024
Create this large everlasting bouquet that stays beautiful year after year. The flowers are made from green and white crepe paper – and some are also decorated with stamp ink. Everything is cut out using a stencil and glued together with multi glue (drying time approx. 30 minutes per step).
#v17024
How to do it
XL leaf  The bouquet has three XL leaves.
The bouquet has three XL leaves.1  Cut out the stencil for the leaf (PDF). Place the stencil on the crepe paper, making sure it is placed at an angle to the stretch direction. Follow the stretch direction of the crepe paper and cut out the leaf.
Cut out the stencil for the leaf (PDF). Place the stencil on the crepe paper, making sure it is placed at an angle to the stretch direction. Follow the stretch direction of the crepe paper and cut out the leaf.2  Apply a thin line of glue along one of the long straight edges. Twist around 5 cm of two of the thin flower stem wires together to lengthen the stem of the leaf.
Apply a thin line of glue along one of the long straight edges. Twist around 5 cm of two of the thin flower stem wires together to lengthen the stem of the leaf.3  Place the thin florist wire along the edge of the leaf in the wet glue.
Place the thin florist wire along the edge of the leaf in the wet glue.4  Place the other part of the leaf on top with an overlap of 3-4 mm to cover the florist wire and glue.
Place the other part of the leaf on top with an overlap of 3-4 mm to cover the florist wire and glue.5  Shape the leaf by bending the florist wire.
Shape the leaf by bending the florist wire.6  Shape the leaf by creasing the crepe paper. Copy the shape of a real leaf.
Shape the leaf by creasing the crepe paper. Copy the shape of a real leaf.Ball-shaped allium  The bouquet has two allium flowers in light green crepe paper and two in white crepe paper that are dyed light green.
The bouquet has two allium flowers in light green crepe paper and two in white crepe paper that are dyed light green.1  Cut out circles using the stencil. There should be around 100 circles for each ball.
Cut out circles using the stencil. There should be around 100 circles for each ball.2  Cut out three leaves using the stencil. Also cut a strip against the stretch direction that is 1 cm wide and 30 cm long to wrap around the stem.
Cut out three leaves using the stencil. Also cut a strip against the stretch direction that is 1 cm wide and 30 cm long to wrap around the stem.3  Dab green paint onto the polystyrene ball until covered with paint.
Dab green paint onto the polystyrene ball until covered with paint.4  Apply a thin layer of glue to one section of the ball. Crumple the circles and insert them into the ball where there is glue using scissors. Place them as close together as possible all around.
Apply a thin layer of glue to one section of the ball. Crumple the circles and insert them into the ball where there is glue using scissors. Place them as close together as possible all around.5  Use the 1 x 30 cm strip to gather and cover the ends at the bottom of the hydrangea where it is glued to the thick floral stem wire. Attach the leaves to the stem 7-10 cm below the ball.
Use the 1 x 30 cm strip to gather and cover the ends at the bottom of the hydrangea where it is glued to the thick floral stem wire. Attach the leaves to the stem 7-10 cm below the ball.Hoya with curly leaves  Make three climbers of different lengths for the bouquet.
Make three climbers of different lengths for the bouquet.1  Cut out circles using the stencil. You will need around 10 circles for the 1.5 cm polystyrene ball and 15 circles for the 2 cm ball.
Cut out circles using the stencil. You will need around 10 circles for the 1.5 cm polystyrene ball and 15 circles for the 2 cm ball.2  Twist two thin florist wires together to form a long piece of wire. Thread polystyrene balls onto the florist wire and secure them with a little glue. Combine two sizes of balls for a more realistic result.
Twist two thin florist wires together to form a long piece of wire. Thread polystyrene balls onto the florist wire and secure them with a little glue. Combine two sizes of balls for a more realistic result.3  Dab the balls with green craft paint until covered.
Dab the balls with green craft paint until covered.4  Apply glue to the balls. Crumple the circles slightly and use the tip of scissors to insert them into the ball where there is glue. Place them as close together as possible all around.
Apply glue to the balls. Crumple the circles slightly and use the tip of scissors to insert them into the ball where there is glue. Place them as close together as possible all around.Natural branch with crepe leaves  Find a natural branch with lots of twigs on it (approx. 70- 80 cm in length).
Find a natural branch with lots of twigs on it (approx. 70- 80 cm in length).1  Cut out leaves for the branch. Each leaf is made up of two halves that are glued together. Cut enough leaves to cover your branch. For this branch, 36 leaves have been cut out.
Cut out leaves for the branch. Each leaf is made up of two halves that are glued together. Cut enough leaves to cover your branch. For this branch, 36 leaves have been cut out.2  Apply a thin line of glue along the edge of one half of the leaf.
Apply a thin line of glue along the edge of one half of the leaf.3  Place the other half on top with an overlap of 2-3 mm. Make sure that the stretch direction of the crepe paper is at an angle to the centre.
Place the other half on top with an overlap of 2-3 mm. Make sure that the stretch direction of the crepe paper is at an angle to the centre.4  Once the glue on the leaves has dried, shape each leaf with a slight curve. Glue the leaves onto the branch, with around six leaves per branch.
Once the glue on the leaves has dried, shape each leaf with a slight curve. Glue the leaves onto the branch, with around six leaves per branch.Grass blades  Attach narrow leaves to four florist wires to resemble blades of grass.
Attach narrow leaves to four florist wires to resemble blades of grass.1  Cut out long, narrow leaves using the stencil. There should be 1-5 leaves per stem.
Cut out long, narrow leaves using the stencil. There should be 1-5 leaves per stem.2  Glue 1-5 leaves onto the tip of a piece of thick florist wire.
Glue 1-5 leaves onto the tip of a piece of thick florist wire.3  Shape the grass blades by bending and stretching the crepe paper slightly.
Shape the grass blades by bending and stretching the crepe paper slightly.Leaf  Make two large leaves on florist wire for the bouquet.
Make two large leaves on florist wire for the bouquet.1  Cut out the two leaf halves using the stencil. Cut at an angle to the stretch direction. Follow the outline of the stencil and cut the leaves out of the crepe paper.
Cut out the two leaf halves using the stencil. Cut at an angle to the stretch direction. Follow the outline of the stencil and cut the leaves out of the crepe paper.2  Apply a thin line of glue to the edge of one half of the leaf and place the florist wire in it.
Apply a thin line of glue to the edge of one half of the leaf and place the florist wire in it.3  Place the other half on top with an overlap of 2-3 mm.
Place the other half on top with an overlap of 2-3 mm.Trumpet pitcher  Make three trumpet pitchers for the bouquet.
Make three trumpet pitchers for the bouquet.1  Cut out the flower using the stencil.
Cut out the flower using the stencil.2  Cut out three leaves using the stencil.
Cut out three leaves using the stencil.3  Use the sponge to dab a little stamp ink on the flower from the bottom up.
Use the sponge to dab a little stamp ink on the flower from the bottom up.4  Apply a thin line of glue along one of the long straight edges.
Apply a thin line of glue along one of the long straight edges.5  Roll the crepe paper around your finger and glue it together with an overlap of 2 mm.
Roll the crepe paper around your finger and glue it together with an overlap of 2 mm.6  Glue the bottom onto a piece of thick florist wire and crinkle the crepe 'tube' around the wire.
Glue the bottom onto a piece of thick florist wire and crinkle the crepe 'tube' around the wire.7  Glue the three leaves around the bottom of the flower to hide where the stem is glued to the flower.
Glue the three leaves around the bottom of the flower to hide where the stem is glued to the flower.8  Shape the trumpet pitcher into a smooth round tube with a flap hanging over the top. Also stretch the crepe paper slightly to shape the top.
Shape the trumpet pitcher into a smooth round tube with a flap hanging over the top. Also stretch the crepe paper slightly to shape the top.Fringed flower  Make two fringed flowers for the bouquet.
Make two fringed flowers for the bouquet.1  Cut out 8 parts for each flower in white crepe paper using the stencil.
Cut out 8 parts for each flower in white crepe paper using the stencil.2  Cut out two large and three smaller leaves using the stencils.
Cut out two large and three smaller leaves using the stencils.3  Dip the sponge in a thin layer of stamp ink and dab paint on the top of four of the white petals.
Dip the sponge in a thin layer of stamp ink and dab paint on the top of four of the white petals.4  Crinkle the petals together at the bottom and glue them around a piece of thick florist wire.
Crinkle the petals together at the bottom and glue them around a piece of thick florist wire.5  The unpainted petals are used for the outermost layer.
The unpainted petals are used for the outermost layer.6  Glue the three small green leaves onto the florist wire right below the flower.
Glue the three small green leaves onto the florist wire right below the flower.7  Glue the large leaves onto the stem in pairs 9 cm below the flower.
Glue the large leaves onto the stem in pairs 9 cm below the flower.Anthurium  Make two anthuriums for the bouquet.
Make two anthuriums for the bouquet.1  Cut out the parts in white and green crepe paper using the stencils. Make sure that the stencils are positioned correctly in relation to the stretch direction of the crepe paper.
Cut out the parts in white and green crepe paper using the stencils. Make sure that the stencils are positioned correctly in relation to the stretch direction of the crepe paper.2  Apply a thin line of glue along the straight edge of the petal. Place 1/5 part of a piece of thin florist wire in the glue.
Apply a thin line of glue along the straight edge of the petal. Place 1/5 part of a piece of thin florist wire in the glue.3  Stretch and roll the white crepe paper together and twist the roll to make a slim, pointed shape.
Stretch and roll the white crepe paper together and twist the roll to make a slim, pointed shape.4  Shape the white tubular centre of the anthurium before gluing it onto the stem.
Shape the white tubular centre of the anthurium before gluing it onto the stem.5  Unroll the white crepe paper and start with a line of glue, placing a piece of thick florist wire in it. Roll the white tubular centre of the flower around the florist wire, adding glue as you roll.
Unroll the white crepe paper and start with a line of glue, placing a piece of thick florist wire in it. Roll the white tubular centre of the flower around the florist wire, adding glue as you roll.6  Glue the white crepe paper for the tubular centre of the flower onto a piece of thick florist wire. Start by applying a thin line of glue to the paper to attach the wire. Roll and glue until all the crepe paper is attached to the wire.
Glue the white crepe paper for the tubular centre of the flower onto a piece of thick florist wire. Start by applying a thin line of glue to the paper to attach the wire. Roll and glue until all the crepe paper is attached to the wire.7  Shape and twist the white tubular piece while the glue is still wet – thin and round at the top and wider at the bottom.
Shape and twist the white tubular piece while the glue is still wet – thin and round at the top and wider at the bottom.8  Allow the glue to dry before carefully dabbing on colour with a sponge. Start at the bottom and have the colour fade towards the middle.
Allow the glue to dry before carefully dabbing on colour with a sponge. Start at the bottom and have the colour fade towards the middle.9  Extend the stem of the flower by twisting 4 cm of two thick florist wires together. Cut a strip of crepe paper 1 cm wide and 30 cm long against the stretch direction.
Extend the stem of the flower by twisting 4 cm of two thick florist wires together. Cut a strip of crepe paper 1 cm wide and 30 cm long against the stretch direction.10  Attach the petals one by one under the white tubular centre with glue. Also glue on a 1 cm wide strip of crepe paper to hold the leaves in place and hide the base of the flower.
Attach the petals one by one under the white tubular centre with glue. Also glue on a 1 cm wide strip of crepe paper to hold the leaves in place and hide the base of the flower.11  Finish the flower by gluing on the three small leaves at the bottom. Pull the strip as you wind it around the florist wire.
Finish the flower by gluing on the three small leaves at the bottom. Pull the strip as you wind it around the florist wire.12  Cover the entire florist wire with the 1 x 30 cm strip. Twist and glue while stretching the crepe paper diagonally downwards.
Cover the entire florist wire with the 1 x 30 cm strip. Twist and glue while stretching the crepe paper diagonally downwards.13  Make sure that the area where the two florist wires are twisted together is also covered with crepe paper.
Make sure that the area where the two florist wires are twisted together is also covered with crepe paper.How to colour crepe paper with Plus Color Craft Paint.  Use white crepe paper.
Use white crepe paper.1  Pour 1/2 litre of water into a bowl and stir in 1/2 teaspoon of paint.
Pour 1/2 litre of water into a bowl and stir in 1/2 teaspoon of paint.2  Stir well, also at the bottom of the bowl so that the paint does not settle.
Stir well, also at the bottom of the bowl so that the paint does not settle.3  Cut out a strip of 8 x 30 cm white crepe paper against the stretch direction.
Cut out a strip of 8 x 30 cm white crepe paper against the stretch direction.4  Dip one edge of the paper into the dye bath so that the colour is absorbed and fades gradually towards the opposite edge.
Dip one edge of the paper into the dye bath so that the colour is absorbed and fades gradually towards the opposite edge.5  To dye the entire piece, place the crepe paper in the bowl so that it is covered completely by the water, preferably overnight. Allow the paper to soak for 1-8 hours, depending on how bright you want the colour to be: 1 hour results in a delicate mint colour, while overnight results in a light green colour.
To dye the entire piece, place the crepe paper in the bowl so that it is covered completely by the water, preferably overnight. Allow the paper to soak for 1-8 hours, depending on how bright you want the colour to be: 1 hour results in a delicate mint colour, while overnight results in a light green colour.6  Remove the paper from the dye bath and squeeze out the water.
Remove the paper from the dye bath and squeeze out the water.7  Place the paper on an absorbent tea towel and allow to dry flat.
Place the paper on an absorbent tea towel and allow to dry flat.Dyed flower  The flower is made from white crepe paper dyed with Plus Color Craft Paint. Make 4 flowers for the bouquet.
The flower is made from white crepe paper dyed with Plus Color Craft Paint. Make 4 flowers for the bouquet.1  Cut out eight petals for each flower using the stencil. Make sure to follow the stretch direction of the three stripes on the stencil. Tip: Fold the paper four times, but wide enough for the stencil. This lets you cut out four petals at the same time.
Cut out eight petals for each flower using the stencil. Make sure to follow the stretch direction of the three stripes on the stencil. Tip: Fold the paper four times, but wide enough for the stencil. This lets you cut out four petals at the same time.2  Shape the petals by stretching the middle of the leaf around your thumb. Twist the top part back and forth slightly towards the front and back of the petal. Gather together the bottom of the petal and twist slightly.
Shape the petals by stretching the middle of the leaf around your thumb. Twist the top part back and forth slightly towards the front and back of the petal. Gather together the bottom of the petal and twist slightly.3  First glue two petals onto a piece of thick florist wire, then attach the other petals staggered, with three petals each time around.
First glue two petals onto a piece of thick florist wire, then attach the other petals staggered, with three petals each time around.Hydrangea  Make two hydrangeas for the bouquet. The hydrangeas are made from white crepe paper dyed with Plus Color Craft Paint.
Make two hydrangeas for the bouquet. The hydrangeas are made from white crepe paper dyed with Plus Color Craft Paint.1  Using the stencil (design 11), cut out 5 x 20 petals, 1 x 30 cm strip of coloured crepe paper and four green wrapper leaves.
Using the stencil (design 11), cut out 5 x 20 petals, 1 x 30 cm strip of coloured crepe paper and four green wrapper leaves.2  Cut a piece of thin florist wire into 10 cm pieces. Glue five petals onto each florist wire. Start with two on the inside and then three on top of these. Make a total of 20 stems with petals for each hydrangea.
Cut a piece of thin florist wire into 10 cm pieces. Glue five petals onto each florist wire. Start with two on the inside and then three on top of these. Make a total of 20 stems with petals for each hydrangea.3  Glue the other end of the 20 pieces of thin florist wire with petals onto a piece of thick florist wire. Use the 1 x 30 cm strip to gather and cover the ends at the bottom of the hydrangea where it is glued to the thick floral stem wire.
Glue the other end of the 20 pieces of thin florist wire with petals onto a piece of thick florist wire. Use the 1 x 30 cm strip to gather and cover the ends at the bottom of the hydrangea where it is glued to the thick floral stem wire.4  Glue the green wrapper leaves to complete the hydrangea. Shape the flower by bending the thin flower wires to create a beautiful cluster. Also straighten the petals so that some are facing opposite to the others.
Glue the green wrapper leaves to complete the hydrangea. Shape the flower by bending the thin flower wires to create a beautiful cluster. Also straighten the petals so that some are facing opposite to the others.Template  Print the template here.
Print the template here.Also go exploring in
