5576b62a8236a.jpg)
A decorated Clip Board
#v13313
Three of the four Clip Boards shown here are decorated with Vivi Gade Design paper (the Paris series) glued on the front. The fourth Clip Board is painted with blackboard paint which is suitable as a base for decorations and messages written in chalk.
#v13313
How to do it Download the templates/recipes

1. Remove the protective foil from the Clip Board's metal clip. Use a craft knife for trimming the edges.

2. Insert a piece of wire through the two holes of the clips and tighten by twisting the wire, so that the clip is kept open. This gives more space when attaching the decorative paper to the edge.

3. Print the template with the clip which is available as a separate file to this idea. Cut and check that the format fits, otherwise adjust by eye.

4. Place the template on the design paper and draw around the template roughly 1-2 mm from the edge of the template at the top as well as the sides. Cut out.

5. Apply a coat of VTR adhesive onto the front of the clip board. NB: only apply the adhesive to the top half of the clip board and attach the design paper, before doing the bottom half.

6. Apply a coat of VTR adhesive to the bottom half of the clip board and attach the rest of the design paper.

7. Smooth out the paper with your hands – from the top and down.

8. Cut a piece of design paper to fit the bottom bare area of the Clip Board. Adjust the size and the pattern. Now leave to dry. You may apply pressure whilst drying. NB: if the finished Clip Board is bowing, apply a coat of VTR adhesive to the back.
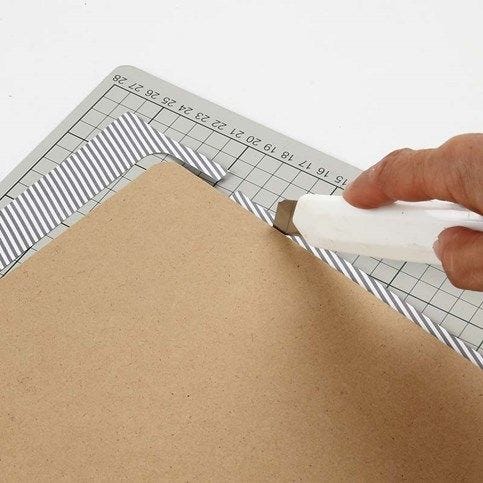
9. Trim the excess paper along the edges, cutting from the back.

Variants -

Also go exploring in