
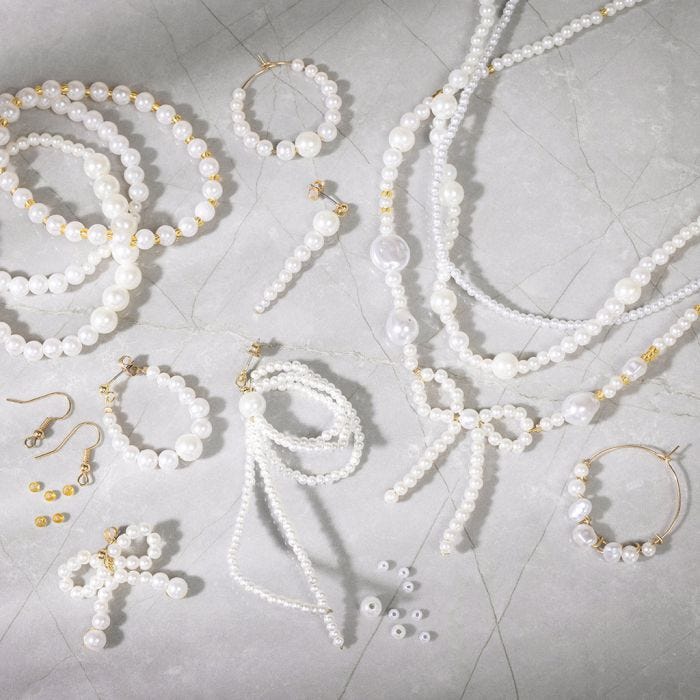
Creative idea
Jewellery with pearlescent white beads
#v16947
Make gorgeous mother-of-pearl jewellery on both jewellery elastic and jewellery wire. Mix the different sizes of beads to create a unique design for earrings, bracelets and necklaces. Create cute bows, elegant spirals or other designs.
#v16947
How to do it
1  For these stud earrings, you need 2 head pins, 2 round jump rings and 2 stud earrings.
For these stud earrings, you need 2 head pins, 2 round jump rings and 2 stud earrings.2  Thread the beads by size, starting with the two smallest ones.
Thread the beads by size, starting with the two smallest ones.3  Use round nose pliers for the head pin. Hold the pliers close to the beads before twisting the wire.
Use round nose pliers for the head pin. Hold the pliers close to the beads before twisting the wire.4  Twist the end of the head pin around one side of the pliers.
Twist the end of the head pin around one side of the pliers.5  Attach the stud earring, twist the end of the head pin around itself and into the bead.
Attach the stud earring, twist the end of the head pin around itself and into the bead.6  For these earrings, you will need: 2 x 15 cm jewellery wire and 4 crimp beads. Wax beads: 2 x 8 mm – 8 x 6 mm – 8 x 5 mm and 8 x 4 mm and 8 x 4 mm.
For these earrings, you will need: 2 x 15 cm jewellery wire and 4 crimp beads. Wax beads: 2 x 8 mm – 8 x 6 mm – 8 x 5 mm and 8 x 4 mm and 8 x 4 mm.7  Slide the crimp bead onto the wire. Thread the wire through the eyelet on the stud earring and then back through the crimp bead. Squeeze the crimp bead tightly around the two wires. Cut off the excess wire close to the crimp bead.
Slide the crimp bead onto the wire. Thread the wire through the eyelet on the stud earring and then back through the crimp bead. Squeeze the crimp bead tightly around the two wires. Cut off the excess wire close to the crimp bead.8  Finish with another crimp bead after threading all the beads.
Finish with another crimp bead after threading all the beads.9  Pull the wire up through the push back on the stud earring. Pull the wire back through the crimp bead and squeeze it closed like on the other side. Cut off the excess wire.
Pull the wire up through the push back on the stud earring. Pull the wire back through the crimp bead and squeeze it closed like on the other side. Cut off the excess wire.10  For these bow earrings, you will need: 2 x 15 cm sturdy jewellery wire and 2 stud earrings. Wax beads: 4 x 6 mm, 4 x 5 mm, 44 x 3 mm.
For these bow earrings, you will need: 2 x 15 cm sturdy jewellery wire and 2 stud earrings. Wax beads: 4 x 6 mm, 4 x 5 mm, 44 x 3 mm.11  Bend an eyelet using round nose pliers on the end of the 15 cm piece of wire.
Bend an eyelet using round nose pliers on the end of the 15 cm piece of wire.12  Thread wax beads onto the wire in the following order: 1 x 6 mm – 1 x 5 mm – 2 x 3 mm. Pull on the stud earring.
Thread wax beads onto the wire in the following order: 1 x 6 mm – 1 x 5 mm – 2 x 3 mm. Pull on the stud earring.13  Continue with 9 x 3 mm wax beads. Now twist the wire around itself at the stud and continue with another 9 beads.
Continue with 9 x 3 mm wax beads. Now twist the wire around itself at the stud and continue with another 9 beads.14  Shape the bow and then twist the wire around itself at the stud again.
Shape the bow and then twist the wire around itself at the stud again.15  Add the last few beads: 2 x 3 mm – 1 x 5 mm and 1 x 6 mm. Finish by twisting the end of the wire using the round nose pliers and cutting off any excess using wire cutters.
Add the last few beads: 2 x 3 mm – 1 x 5 mm and 1 x 6 mm. Finish by twisting the end of the wire using the round nose pliers and cutting off any excess using wire cutters.16  For the bow pendant, you will need: 20 cm sturdy jewellery wire, 1 x 6 mm wax bead and 40 x 3 mm wax beads.
For the bow pendant, you will need: 20 cm sturdy jewellery wire, 1 x 6 mm wax bead and 40 x 3 mm wax beads.17  Use the round nose pliers to twist the end of the wire into an eyelet.
Use the round nose pliers to twist the end of the wire into an eyelet.18  Thread beads onto the wire: 10 x 3 mm – 1 x 6 mm and 10 x 3 mm. Thread the wire back through the 8 mm bead and use pliers to pull it through.
Thread beads onto the wire: 10 x 3 mm – 1 x 6 mm and 10 x 3 mm. Thread the wire back through the 8 mm bead and use pliers to pull it through.19  Add 10 x 3 mm beads and repeat as before with threading the wire through the 6 mm bead.
Add 10 x 3 mm beads and repeat as before with threading the wire through the 6 mm bead.20  Thread 7 x 3 mm beads onto the wire and use round nose pliers to bend the wire into an eyelet.
Thread 7 x 3 mm beads onto the wire and use round nose pliers to bend the wire into an eyelet.21  Measure around your neck to determine the length of the necklace. Add approx. 20 cm so that there is also room for attaching the clasp and bow. Now divide the wire into two equal parts.
Put a crimp bead on the end and twist the wire around the wire of the bow. Now thread the wire back through the crimp bead. Pull the crimp bead close to the wire of the bow and squeeze it closed using pliers. Cut off the excess wire.
Measure around your neck to determine the length of the necklace. Add approx. 20 cm so that there is also room for attaching the clasp and bow. Now divide the wire into two equal parts.Put a crimp bead on the end and twist the wire around the wire of the bow. Now thread the wire back through the crimp bead. Pull the crimp bead close to the wire of the bow and squeeze it closed using pliers. Cut off the excess wire.
22  Thread beads onto the two pieces of wire to create your own design.
Thread beads onto the two pieces of wire to create your own design.23  Attach a clasp to the necklace: Put a crimp cover and crimp bead on both ends of the wire pieces. Place the crimp cover close to the last bead and slide the crimp bead into the crimp cover and squeeze it together. Cut off the excess wire and then squeeze the crimp cover closed. Attach the jewellery clasp with a round jump ring in the eyelet of the crimp cover. Add a round jump ring into the other eye of the crimp cover to finish the necklace.
Attach a clasp to the necklace: Put a crimp cover and crimp bead on both ends of the wire pieces. Place the crimp cover close to the last bead and slide the crimp bead into the crimp cover and squeeze it together. Cut off the excess wire and then squeeze the crimp cover closed. Attach the jewellery clasp with a round jump ring in the eyelet of the crimp cover. Add a round jump ring into the other eye of the crimp cover to finish the necklace.24  These earrings are made with 2 hoops and wax beads: 2 x 8 mm – 4 x 6 mm – 12 x 5 mm – 12 x 4 mm.
These earrings are made with 2 hoops and wax beads: 2 x 8 mm – 4 x 6 mm – 12 x 5 mm – 12 x 4 mm.25  Open the end of the hoop using pliers.
Open the end of the hoop using pliers.26  Thread the wax beads in this order: 8 mm beads in the middle, then 6 mm, 5 mm and 4 mm.
Thread the wax beads in this order: 8 mm beads in the middle, then 6 mm, 5 mm and 4 mm.27  Bend the end of the hoop back into the closure.
Bend the end of the hoop back into the closure.28  For these earrings, you will need: 2 hoop earrings, 15 cm of sturdy jewellery wire. Wax beads: 2 x 11 x 14 mm, 4 x 6 x 7 mm, 4 x 5 mm and 4 x 4 mm.
For these earrings, you will need: 2 hoop earrings, 15 cm of sturdy jewellery wire. Wax beads: 2 x 11 x 14 mm, 4 x 6 x 7 mm, 4 x 5 mm and 4 x 4 mm.29  Twist the end of the wire using round nose pliers.
Twist the end of the wire using round nose pliers.30  Use the round nose pliers to twist the wire between each bead to form a spiral.
Use the round nose pliers to twist the wire between each bead to form a spiral.31  Cut off the excess wire. Twist open the clasp on the hoop.
Cut off the excess wire. Twist open the clasp on the hoop.32  Pull the beaded spiral onto the hoop.
Pull the beaded spiral onto the hoop.33  Now bend back the clasp of the hoop.
Now bend back the clasp of the hoop.34  For this stud earring, you will need: 1 earring stud, 1 x 45 cm jewellery wire, 2 crimp beads. Wax beads: 1 x 8 mm and 137 x 3 mm. If you want to make a pair of these earrings, you will need 100 x 3 mm wax beads for each.
For this stud earring, you will need: 1 earring stud, 1 x 45 cm jewellery wire, 2 crimp beads. Wax beads: 1 x 8 mm and 137 x 3 mm. If you want to make a pair of these earrings, you will need 100 x 3 mm wax beads for each.35  Cut a piece of wire of around 27 cm. Put a crimp bead on the end of the wire and squeeze it closed.
Cut a piece of wire of around 27 cm. Put a crimp bead on the end of the wire and squeeze it closed.36  Thread 32 x 3 mm beads onto the wire. Add 1 x 6 mm and again 23 x 3 mm. Thread the wire back through the 6 mm bead.
Thread 32 x 3 mm beads onto the wire. Add 1 x 6 mm and again 23 x 3 mm. Thread the wire back through the 6 mm bead.37  Add 23 x 3 mm beads to the wire and thread it through the 6 mm bead. Now add 28 beads and thread the wire through the 6 mm bead again. Now thread the wire through the eyelet on the stud.
Add 23 x 3 mm beads to the wire and thread it through the 6 mm bead. Now add 28 beads and thread the wire through the 6 mm bead again. Now thread the wire through the eyelet on the stud.38  Thread the wire back through the 8 mm bead.
Thread the wire back through the 8 mm bead.39  Add 30 x 3 mm beads and finish with a crimp bead. Cut off the excess wire.
Add 30 x 3 mm beads and finish with a crimp bead. Cut off the excess wire.40  Make these bracelets with elastic cord. Measure around your wrist to get the right size for the elastic cord and add an additional 10 cm for knotting the ends.
Make these bracelets with elastic cord. Measure around your wrist to get the right size for the elastic cord and add an additional 10 cm for knotting the ends.41  Here you can see necklaces on elastic cord in different designs.
Here you can see necklaces on elastic cord in different designs.42  Tie a stopper bead to the end before threading on the beads to prevent them from falling off.
Tie a stopper bead to the end before threading on the beads to prevent them from falling off.43  Four different sizes of beads were used for this necklace.
Four different sizes of beads were used for this necklace.44  Tie the cord together with a double knot and pull tightly.
Tie the cord together with a double knot and pull tightly.Also go exploring in
